Graduate Planner
NC State’s Graduate Planner tool allows you and your advisor to craft a plan for the classes you wish to take in the semesters leading up to your graduation. Planned coursework is then available in the Enrollment Wizard, streamlining the process during enrollment.
How to access your Graduate Planner
MyPack Portal > Student Homepage > Planning & Enrollment tile > Graduate Degree Planning > Graduate Planner
- Log into MyPack Portal
- View your Student Homepage
- Select the ‘Planning & Enrollment’ tile
- From the left-hand navigation menu, select ‘Graduate Degree Planning’
- Select ‘Graduate Planner’
- If you are enrolled in multiple plans, select which one you would like to view from the dropdown menu at the top of the screen
Important Reminders
- Storing classes in your Graduate Planner does not guarantee your enrollment in those courses, or that the classes will be offered during the planned term.
- Your advisor also has access to your Graduate Planner. Work together to create the best strategy for an on-time graduation.
Features of the Graduate Planner
Add Courses to the Graduate Planner
Browse remaining requirements
Choosing to Browse Remaining Requirements is the recommended method for building your Graduate Planner. The requirements are specified by academic plan and are based on the requirements stated in the University’s published catalog. You can add the courses you intend to take to your Planner by selecting the outstanding requirements and indicating the term in which they will be taken.
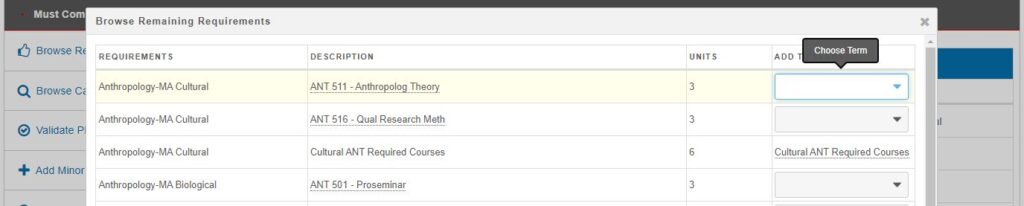
Courses added to the Planner may have a red warning icon next to them if prerequisites or requirements have not been met, or if the course is planned for a term in which it is not offered. For example, if a course is only offered in Fall terms but it has been added for a Spring term, a warning icon will appear.


Browse Catalog
Choosing to Browse Catalog allows you to search for specific courses by course subject to add to the Planner. Select a subject from the dropdown menu when prompted. A list of all courses currently in the catalog for that subject will appear, along with the number of units offered for that course. You can also choose to filter the results by keyword or units. Click on the course title to view the details of the course, the terms offered, requisites, and the description.
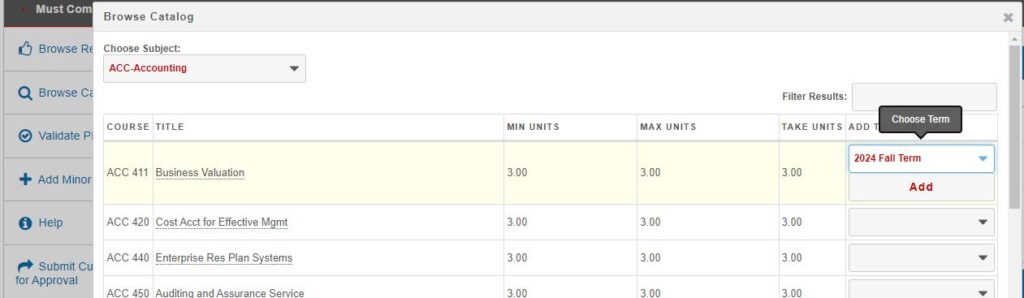
Select a course you would like to add, and choose a term to plan it for under the right “Add to Planner” dropdown. Select ‘Add,’ and the course will be added to the Planner for the chosen term.
Validate Plan
Once courses have been added to the Planner, you can choose to Validate the Plan from the left side of the screen. The Plan Validation may return the following errors or warnings:
- Unmet Requirements: Unmet degree requirements have not been added to the plan
- Committee: A graduate committee is required for this program but has not yet been created
- Non-Degree Courses: A course outside of the student’s degree requirements
- Courses planned for terms in which they are not typically offered
- Check course requisites for these courses: Requisites are currently unmet and/or unplanned
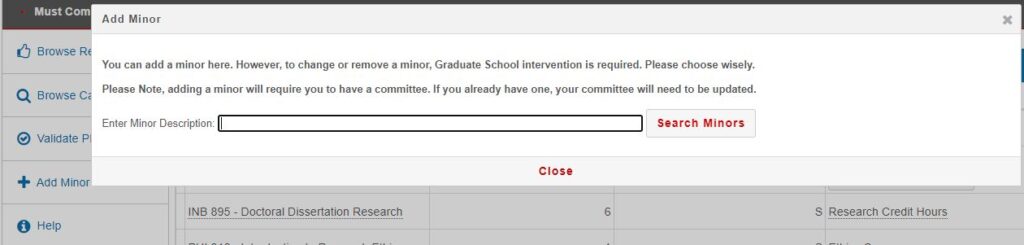
Add a Minor
If your academic plan permits a minor, you can add a minor to your Planner using the Add Minor feature. Students in academic plans that do not require a committee may not have a minor. Type in the name of the minor and click ‘Search Minors.’ Click on the appropriate minor to add it to your academic record. Note that you can add a minor, but to remove a minor you must contact your academic department for assistance.
Once a minor is added to your record, you will see a separate degree audit for the minor. A minor cannot be awarded unless the degree audit for the minor is complete (all requirements have been met).
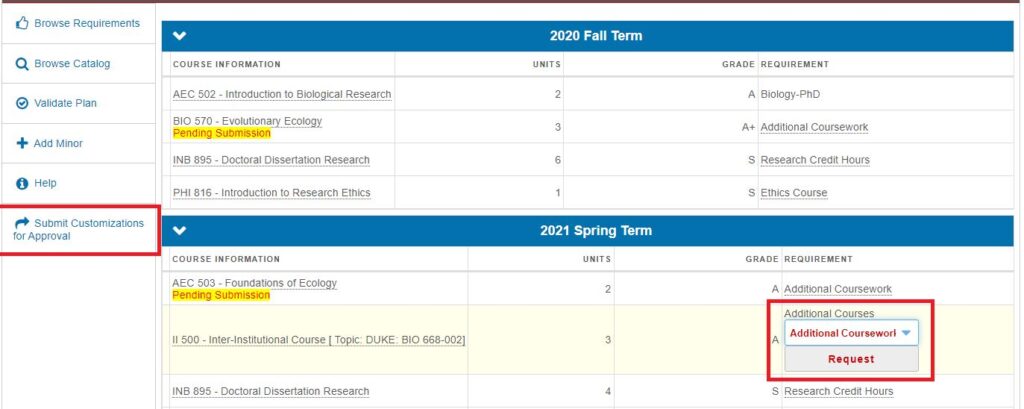
Submit Customization Requests
If you would like to request a course substitution to meet degree requirements, you may request customizations in the Planner. In the drop-downs you see in the Planner, select the requirement you would like the course to fulfill, then click ‘Request.’ You will then see ‘Pending Submission’ notations highlighted in yellow.
When a customized course is added to the Planner, it is not yet approved. It will be routed to your department for approval when you select ‘Submit Customizations for Approval.’ This will route the request(s) to your DGP (and to your advisor/committee chair if you have an approved committee). You should add all desired customizations to your Planner before submitting them for approval.
General Comments
If your department or the Graduate School have entered administrative notes in your degree audit, they will be visible to you at the bottom of your Planner under a ‘General Comments’ section.
Request Previous Master’s Credit
Doctoral students are eligible to request credit from a previous, completed master’s degree from another university. Please work with your advisor/department to determine if you should request previous master’s credit, then follow the instructions here.
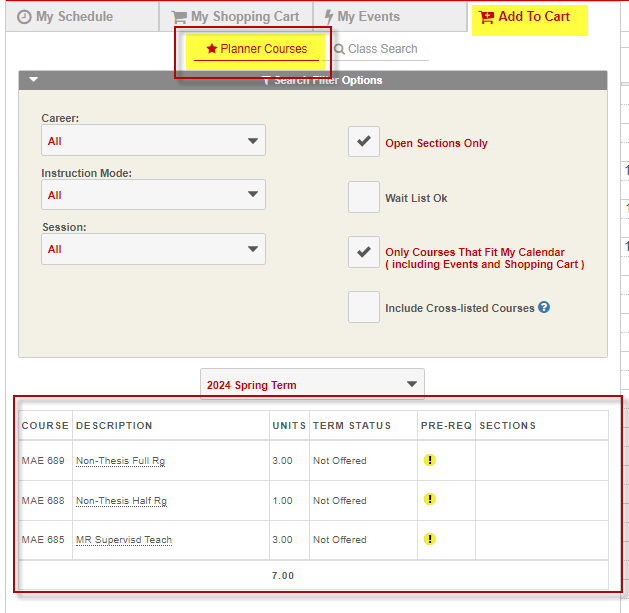
Enroll in Planned Courses
Adding future coursework to your Planner is a great way to streamline the process during enrollment time; it will allow you to easily add your Planned courses to the Enrollment Wizard. The instructions below detail how to access the Enrollment Wizard and add Planner courses to your Cart.
- Log into MyPack Portal
- View your Student Homepage
- Select the ‘Planning & Enrollment’ tile
- From the left-hand navigation menu, select ‘Enrollment Wizard’
Use the drop-down to select the upcoming term and to see the available options for your planned classes. Use the Enrollment Wizard’s “Add to Cart” feature to temporarily store classes in your Shopping Cart before adding them to your class schedule.
You can select courses directly from your Graduate Planner: